Mostrando entradas con la etiqueta Tarjeta. Mostrar todas las entradas

miércoles, 9 de abril de 2014

Waterfall Card

Hola!
El sábado pasado hice un taller de scrap para niños, y elegí  esta tarjeta para empezar.
Ya he hecho un par de tarjetas así que podéis ver en el blog, pero a esta le he dado un aire más infantil.
Espero que os guste.

Hi!
Last Saturday I taught scrap to some children, and I decided to start with this project.
I've already made a couple of these cards and you can see them in the blog, but I gave a childlish touch to this one.
Hope you like it.


miércoles, 2 de abril de 2014

Tarjeta Cumpleblog para Isa

Hace poco ha sido el 4º cumpleblog de Isa, de Papel de lunares, e hizo un pequeño concurso con un regalo a la mejor tarjeta. Se la hice y se la entregué, pero realmente he estado muy liado y se me pasó el plazo de entrega en el blog. Y ya que estaba hecha, es una tontería no subirla, no?
Tenía que ser en color madera, chocolate y otro color a nuestra elección. Yo elegí el azul.
No es uno de mis mejores trabajos, pero la hice con mucho cariño.
Felicidades con retraso, Isa!

A few days ago, Isa, from Papel de lunares, celetrated her 4th blog birthday, and she organised a small contest with a present for the best card. I made it and delivered it, but I've been really busy these days and I forgot to upload it. The work's done, so why not uploading it?
The card had to be in wood, chocolate colour and a colour of our choice. I chose blue.
It isn't one of my best works, but it's made with a lot of love.
Delayed congratulations, Isa! 


miércoles, 26 de marzo de 2014

Tarjeta de 30 Cumpleaños para mi Cuñado

Hola!
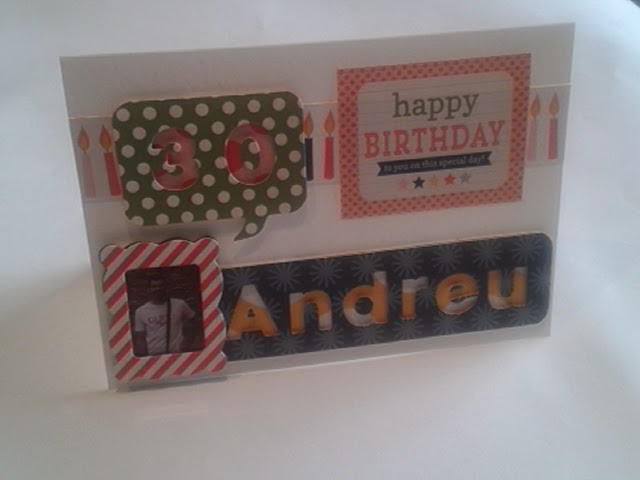
Dentro de poco es el 30º cumpleaños del novio de mi hermana, y me pidió una tarjeta y un álbum de fotos.
Esta es la tarjeta que hice. Podéis ver el álbum pinchando aquí.
Quería probar a jugar con letras en negativo. Esto es lo que ha salido:

Hi!
In a few days my sister's boyfriend will celebrate his 30th birthday and she asked me to make a card and a photo album.
This is the card I made. You can see the album if you click here.
I wanted to play with letters in negative. This is what I got:


miércoles, 5 de marzo de 2014

Tarjeta de Cumpleaños para una Mami de 40 Años

Otro miércoles y otra tarjeta.
Esta vez se trata de una tarjeta de cumpleaños para una amiga que cumplía 40 años.
Nada más que papel decorado sobre cartulina marrón y unas letras troqueladas en goma eva adhesiva.
Gracias por pasaros.

One more Wednesday and one more card.
This time is a birthday card for a friend who reasches 40.
Just some patterned paper on brown cardstock and some letters die-cut on foamy.
Thanks for stopping by.


miércoles, 26 de febrero de 2014

Tarjeta Infantil de Cumpleaños

Hola!
Solo unas palabras para mostraros una tarjeta que hice para el 11º cumpleaños de una niña.
Algo muy sencillito: Una tarjeta rosa, sobre ella pegué un trozo de cartulina blanca de forma que se viese un poco el borde, unas flores estampadas, un poquito de baker's twine rosa y la palabra "felicidades" en varios colores.
Perdón por el color tan oscuro en la foto. Estuve trasteando con la cámara y olvidé cambiar los ajustes.

Hi!
Just a ferw words to show you the card I made for the 11th birthday of a girls.
Something really simple: A pink card, I glued a white cardboard so you can see the pink border, some stamped flowers, a bit of pink baker's twine and the word "Happy birthday" in different colours.
sorry for the dark colour of the picture. I was playing with the camera and forgot to restore the settings back.


sábado, 22 de febrero de 2014

Tarjeta para el "Día de la Abuela"

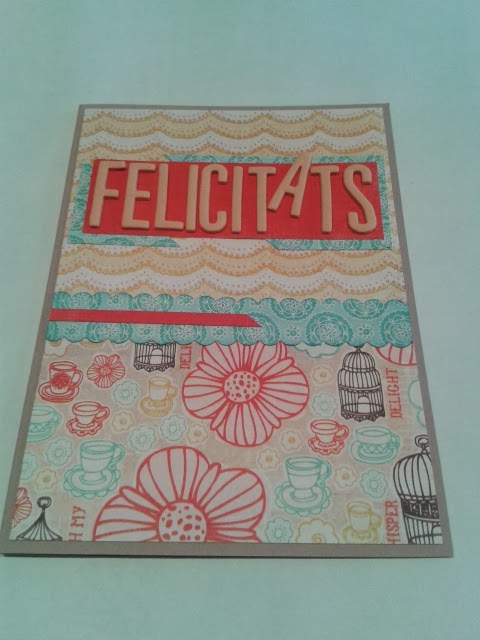
Pues eso, que una amiga me pidió una tarjeta para regalársela a su abuela francesa en el día de la abuela. No sabía que ese día existía. Y no sabía como hacerla. Al final ha salido esta. Simple, pero resultona.

A friend of mine asked me to make a card for her French grandmother in the "Grandmother's Day". I didn't know that this day exists. And I didn't know how to make it. At the end, this is what I got. Simple but nice.


Gracias por pasaros.
Thanks for stopping by.


sábado, 1 de febrero de 2014

Masculine Card

Tal y como os prometí la semana pasada, aquí está la otra tarjeta que hice pero que no fue elegida. (ú_ù)
Un sello de fondo imitando madera en tinta azul, tres trozos de papel azul que tenía en mi caja de scraps, un sello steampunk y para retamar, unos troqueles de engranages, un poco de washi tape azul con engranages y un poco de clear tape con el mensaje "Follow your dreams".
En las tarjetas, al ser más quepeñas, me resulta más fácil ser "desordenado".


As I promised last week, here's the other card I made for a man, but this one wasn't chosen. (ú_ù)
A background stamp imitating wood in blue ink, three scraps of blue paper from my scrap box, a steampunk stamp and to finish it, some gear diecuts, a bit of blue washi tape with more gears and a bit of clear tape with the message "Follow your dreams".
I find easier to be "messy" with cards because they are smaller.


miércoles, 22 de enero de 2014

Tarjeta masculina

Hola!
He hecho esta tarjeta para regalar dos botellas de vino a un hombre.
Hice dos, y al final se quedaron con esta. La semana que viene os pongo la otra opción.
Cartulina marrón, máscara de Tim Holz con Tinta Distres Marrón, sello masculino en negro, dos trozos de papel decorado con el sello gentleman, un troquel enmarcando el sello y dos trozos de washi tape imitando madera. Rápido y sencillo.

Hi!
I made this card to give two bottles of wine to a man as a present.
I made two of them, but this is the one chosen. Next week I'll upload the other one.
Brown cardboar, Tim Holz mask with Brown Distress Ink, Masculine stamp in black, two scraps of decorated paper with the "Gentleman" stamp, a die-cut of a book plate and the pieces of washi tape imitating wood. Fast and simple.


lunes, 9 de diciembre de 2013

Tarjeta de Cumpleaños

Hola de Nuevo!

Lo se. Hace un montón que no actualizo el blog. Entre otros motivos, ahora no tengo internet en casa y se me hace difícil actualizarlo, pero tengo un montón de fotos pendientes de publicar, así que, en cuanto me ponga, tendréis ideas para aburrir.
El otro día hice una tarjeta de cumpleaños para la hija de unos amigos que cumplia 2 añitos.
Siempre que me pongo a hacer tarjetas, quiero hacer algo cargado y lleno de decoraciones, pero esto es lo que conseguí. Por supuesto, me gustó, por eso la dejé así:


Hi again!

I know. It's been a looong time since I updated the blog. Among other reasons, now I don't have internet access at home, so it's really difficult to update it, but I have a lot of photos ready to upload, so as soon as I start writing new posts, you will see tons of new ideas.
A few days ago I made a card for a friends' daughter, who celebrated her 2nd birthday.
When I start making a new card, I always want to do something overdecorated, but tI always get things like this one. I like what I got, that's why I left it this way:


miércoles, 3 de julio de 2013

Intercambio de Tarjeta y Punto de Libro

El otro día Iva, de Scrap i Pebre, nos propuso hacer un intercambio.
Teníamos que hacer una tarjeta y un punto de libro y llevarlos a su tienda. Después, ella los repartiría al azar entre todos los participantes. Me pareció una idea genial, así que enseguida me puse manos a la obra!
Aquí os pongo un par de fotos de lo que he hecho yo.

The other day Iva, from Scrap i Pebre, proposed us a swap.
We had to make a card and a bookmark and bring them to her shop. After that, she would shuffle them and give them back to us. I loved the idea, so I started right away.
Here are a pair of pictures of what I've made.

La tarjeta quería hacerla de un estilo vintage, un estilo que no se por donde agarrar, y después de hacer el taller de tintas con Isa, de Papel de Lunares (aún no he colgado las fotos de lo que hicimos), esto es lo que conseguí.
El fondo es un sello de letras con polvos de embossing blancos y después he aplicado tintas distress en azul y rosa. Despues hice una especie de paquete envejeciéndolo con tintas distress marrones y un par de sellos.
Para finalizar, una cinta azul alrededor del paquete y un par de sellos reforzando la idea de viaje.
Hice este tema porque con lo del intercambio me imaginé recibiendo un paquete de un lugar desconocido.

I wanted to make the card in a vintage style, a style that I don't know how to start with. But after taking classes with Isa, from Papel de Lunares (I didn't upload the pictures yet), that's what I got.
The background is made with a letter stamp embossed with white powder and then I applied blue and pink distress ink. Then I made a kind of package with brown distress inks and a pair of stamps.
Finally there's a ribbon around the package and two stamps to strenghten the idea of a journey.
The idea of the swap made me think of a package coming from an unknow place.

Y para el marcapáginas no tenía ni idea por donde empezar. Solo tenía claro que quería utilizar el sello de las zapatillas. Así que rebuscando entre mis papeles encontré unos imitando la tela vaquera. Y el resto salió solo. El papel tenía algunas mariposas impresas, así que le añadí otra en relieve. Necesito mejorar mi caligrafía urgentemente.

And for the bookmark I had no idea of how to start. I was only sure that I wanted to use my new acquired stamp of the trainers. So I rummaged in my papers and foud these like jeans. And the rest came up alone.
There were some butterflies printed on the paper, so I added one more in relief.
I urgently need to improve my calligraphy.


Actualización: Alguien ha recibido ya mi tarjeta! Que alegría! Se llama Virginia y me ha dejado unas palabras en el blog. Muchas gracias, Virginia! Espero conocerte algún día. Si vienes por Gandia otra vez, mándame un mail y nos vemos!
Ahora me toca a mi. El jueves iré a ver quien me ha tocado. Que nervios!

Update: Somebody already received my card! How funny! Her name's Virginia and she wrote some words here. Thank you very much, Virginia! I hope to meet you some day. If you come back to Gandia, send me an email so we can meet!
And now it's my turn. On Thursday I'll have my present. I'm nervous!

miércoles, 17 de abril de 2013

Tarjeta de los Miércoles - Tarjeta Cascada

La semana pasada, mientras buscaba vídeos para aprender nuevas técnicas para la feria Creativa Valencia, me encontré con un tutorial para hacer una tarjeta en cascada y me encantó la idea.
Estaba haciendo las invitaciones de comunión que me encargaron, pero pude encontrar un ratillo para hacer esta tarjeta que veis a continuación. La hice por probar, con prisas y con papeles impresos que encontré por internet, pero me encanta! Es divertida y puede servir para un millón de ideas!


Last week, while I was looking for videos to learn more techniques for the fair "Creativa Valencia", I found a  video that explained how to make a "Waterfall" card and I loved the idea.
I was making the invitations for the communion , but I could manage to find some time to make the following card. It's made just for testing, in a rush and with printed papers I found in the internet, but I love it! Is funny and it can be used for a million ideas!


domingo, 14 de abril de 2013

Invitaciones de Comunión

Hola de nuevo!
Esta semana no he colgado la tarjeta de los miércoles porque iba un poco liado con un encargo.
Siiii! Mi primer encargo!!!   \(^o^)/ Way, way!
Me pidieron que hiciera 20 invitaciones para una comunión. Yo esperaba hacer algo facilillo en mi primer encargo pero querían que fueran invitaciones con forma de bolso y en rositas, blancos y negros.
Me mataron! No sabía como hacer una tarjeta así, así que me puse a buscar por internet y después de algunos días acabé comprando una plantilla de una chica australiana. (Lo siento, no pongo un link a su página porque no me acuerdo exactamente a quién se la compré después de buscar en tantas páginas). Supongo que esas plantillas son para la cameo, pero como no la tengo, tuve que cortarlas TODAS a mano. (∪。∪)...zzz
Aunque eso me permitió cambiar un poco la forma para adaptarla a mis gustos.
Las tarjetas tienen forma de bolso, que se abre por arriba. Tienen un cierre de velcro y al abrirlo encuentras un desplegable donde va la foto de la niña y un espacio para poner su dedicatoria. Y abajo un bolsillo donde van dos etiquetas con los datos de la ceremonia en una y los datos del convite en la otra.
Le encantaron! Y me ha pedido 5 más y un libro de firmas.
Tengo sobredosis de rosa, pero estoy contento.
En unos días os pongo las fotos del libro de firmas.
Y este fin de semana es la feria CREATIVA en Valencia. Y viene con sorpresa! En unos días, más info...


Hi again!
This week I couldn't post my Wednesday Card because I've been a bit busy with an order.
Yesss! My first order!!!  \(^o^)/ Way, way!
They asked me to do 20 invitation for a girl's communion. I wanted to do something easy in my first order, but they wanted it handbag shaped and in pinks, whites and blaks.
They killed me! I didn't know how to do a card that way, so I started surfind the internet and, after a few days, I bought a pattern from an Australian girl (sorry, I don't put her link because I don't exactly remember where I bought it after visiting so many sites).
I think this pattern is for the Cameo, but I don't have it, so I had to hand cut ALL of them.
(∪。∪)...zzz
Although, it allowed me to change them a bit to suit my preferences.
The cards are handbag shaped, they are open on the top and locked with velcro. When you open them, you find a bifold with the girl's picture and a space to write her own dedication. And there's also a pocket with two tags. The information of the ceremony is on one of them and the information of the banquet on the other.
She loved them! And asked me to make 5 more and a Guestbook.
I'm overdosed with pink, but I'm really happy.
In a few days I'll post the pictures of the guestbook.
And next weekend there's the Creativa Fair in Valencia. And it comes with a little surprise. More info in a few days...


sábado, 6 de abril de 2013

Tarjeta 60 Cumpleaños - Versión 2.0

Silvia ya me ha pasado la foto de la segunda tarjeta que hice para su suegro, así que os dejo la foto.
Personalmente esta me gustó mucho más. Quedó más masculina, pero al mismo tiempo un poco infantil (siempre me sale mi vena infantil, snif...). Aún no consigo obtener exactamente lo que quiero, pero estoy en ello.
Ánimo, Salva!  p (^o^) q
Usé una cartulina azul de base embossada a mano con una placa de textura de fiskars a la que apliqué tinta blanca con el dedo para resaltar el relieve. Borde punteado con un boli azul metalizado, algunos trozitos de papeles azules y verdes y un pequeño troquel de sizzix con una floritura y el 60 también troquelado.


Silvia already sent me a picture of the second card I made for her father-in-law, so here it is.
I myself prefer this one much more. It looks more masculine, but at the same time a bit childish (My childish part always comes up, sob...). I can't get exactly what I want, but I'm on it.
Cheer up, Salva! p (^o^) q
I used a blue cardboard embossed manually with a texture plate from Fiskars and then I applied white ink with my finger to highlight the emboss. A hand traced line with metallic blue surrounding the blue cardboard, some scraps of blue and green papers, a small die-cut from sizzix with a flourish and the 60 die-cut, too.


jueves, 4 de abril de 2013

Tarjeta de los Miércoles: 60 Cumpleaños

Hace aproximadamente 2 meses Silvia me pidió que hiciera una tarjeta para un sesenta cumpleaños de su suegro. Al principio me pareció buena idea usar colores morados. Pero cuando puse los detalles en plateado no me gustó como quedaba para un chico, así que hice otra. La otra tarjeta me gusta más, pero no le hice foto y ya no os la puedo enseñar. En esta tarjeta el 60 está troquelado directamente sobre fieltro adhesivo, por lo que es fácil de despegar y poner otro número para otra ocasión.


Approximately 2 months ago Silvia asked me to make a 60-birthay card for her father-in-law. I thought of using purples, but when I added the silver details, I didn't really liked it for a man, so I made another one. I like much more the other card, but I didn't take a picture of it and I can't show it to you. In this card the number 60 is die-cut out of adhesive felt, so it can be easily removed to put another number for another occasion.


miércoles, 27 de marzo de 2013

Tarjeta de los Miércoles - Gallinas

Hola de nuevo!
Miércoles nuevo, tarjeta nueva.
Esta era la primera vez que usaba papeles decorados. Hasta entonces solo había usado sellos. Además también conseguí algunos troqueles para la sizzix y ya pude hacer algunas cosas más.
En el centro pegué un círculo festoneado y después troquelé un círculo para que se viera el interior de la tarjeta. En el interior hay un sello en tinta negra y polvo de relieve transparente.
En la parte inferior pegué una tira de papel troquelada con un troquel de Fiskars y directamente estampé sobre ambos papeles.
El detalle del pollito y el banderín están ahí porque al pegar el círculo festoneado se me salió un poco de cola y ensució el papel, y resulta que es el detalle que más me gusta de la tarjeta.


Hi again!
New Wednesday, new card.
This was the first time I used paterned paper. Until then I only used stamps. I also got some dies for the sizzix and I could do some more things.
I glued a scalloped circle in the centre and then I cut out a plain circle so you can see the inside of the card. Inside there's a stamp where I used black ink and clear embossin powder.
In the bottom there's a stripe die-cut with a Fisckars punch and I stamped directly on both papers.
The little chick is there because when I glued the scalloped circle, some glue popped out of the border and I wanted to hide the mistake, but it ended being what I like the most in the whole card.


miércoles, 20 de marzo de 2013

Tarjeta de los Miércoles - Libélulas Enamoradas

Cuarto miércoles de tarjetas. Ya me quedan menos tarjetas de mis inicios, pero esta en particular me gusta mucho. Creo que no tiene nada que envidiar al tipo de tarjetas que hago ahora.
Está hecha con un sello de silicona de Aladine, estampado 2 veces con diferentes tintas verdes, una cinta para separar la imagen, y un sello de caucho, también de Aladine, estampado una vez sobre la tarjeta con tinta dorada y otra vez en otra cartulina, sobre la que se le ha aplicado polvos de embossado dorados y recortado los detalles.
Como siempre, todo muy simple.


Fourth Wednesday of cards. I'm running out of my beginner cards, but I like this one in particular a lot. I think it matches the standard of the kind of cards I'm doing at the moment.
It's made with a silicone stamp from Aladine, stamped twice with different green inks, a ribbon to separate the images, and a rubber stamp, also from aladine, stamped first on the card with golden ink and then on another cardboard, where I applied golden embossing powder and then cut out the details I wanted.
As alwais, everything clear and simple.


domingo, 17 de marzo de 2013

Miniálbum-Diario Primaveral para Chica

Hace un tiempo compré unos papeles por internet y cuando llegaron vi con horror que tenían purpurina. No sabía que hacer con ellos y como se acerca la primavera se me ocurrió hacer un mini pensando en una chica de colegio con estos papeles tan florales, así que decidí hacerlo tipo diario en lugar de mini álbum. Le pusé un montón de bolsillos, sobres, tarjetitas, etiquetas... Primero hice la estructura con los papeles brillantes (argh) y después intenté decorarlo con los mismos papeles, pero no me gustaba y acabé echando mano de unos papeles de Amy Tangerine y de colores básicos y la verdad es que al final me lo pasé genial haciéndolo y no me desagrada como ha quedado. Según iba haciéndolo, se me iban ocurriendo cosas: poner ojales de colores a las tarjetas, decorar algunos bordes como si estuviera cosido, decorar tarjetitas con sellitos de animales... Que disfruté como un enano, vamos!


Some weeks ago I bought some papers in the internet and, when they arrived, I saw with horror that they were all full of glitter. I didn't know what to do with them and, as spring is coming, it occur to me to do a minibook thinking of a school girl with these so floral papers, so I decided making it more like a diary instead of a mini album. I put a lot of pockets, envelopes, cards, tags...
First I made the structure with the glitter papers (argh) and then I tried to decorate it with the same papers, but I didn't really like it and I turned to some papers from Amy Tangerine and basic colours and the truth is that I ended having a lot of fun making the mini and I don't dislike how it looks. While I was making it, more ideas came into my mind: putting coloured eyelets on the cards, decorating some borders to imitate sewing, add some little animal stamps to another cards... in fact, I had a great time!

Portada
(Front Cover)

Primera página con sobre y espacio para poner datos personales
(First page with envelope and a space for personal details)

Primara página abierta
(First page unfolded)

Segunda página con bolsillos y tarjetas
(Second page with pockets and cards)

Un simple tag me inspiró para hacer la página completa.
(A single tag inpired me the whole page)

Tercera página con bolsillo, tags y 2 marcos para fotos.
(Third page with pocket, tags and 2 frames for pictures)

Cuarta página con más bolsillos, tags y un desplegable.
(Fourth page with more pockets, tags and a trifold)

Cuarta página desplegada
(Fourth page unfolded)

Última página con dos bolsillos más para fotos
(Last page with two more pockets for pictures)

Entre cada par de páginas hay un sobre para guardar más fotos o tarjetas.

Between each pair of pages there's an envelop to put more pictures or cards in.

viernes, 15 de marzo de 2013

Tarjeta de los Miércoles - Mi Vecino Totoro

¡Pues sí que empezamos bien!
Hace dos semanas empecé sección y esta semana ya llego tarde.
Pero ha sido un problema aislado, por lo que no debería pasar más.
Aquí os dejo otra de las postales de mis inicios.
Esta está hecha con unos sellos de la película "Mi vecino Totoro", que me compré cuando estuve en Japón, pintados con lápices de colores y una placa de texturas de Fiskars para hacer las gotas de lluvia.
Muy simple y divertida.
Si no habéis visto la película de Totoro, os la recomiendo. Es de animación, pero es muy entrañable.


We start on the wrong footing!
I started a new section two weeks ago and I'm late this one.
But it has been an isolated problem, so it shouldn't happen again.
Here you are another of my beginner cards.
This one is made with some stamps from the film "My neighbor Totoro" I bought when I went to Japan, coloured with crayons and a texture plate from Fiskars to make the rain drops.
Very simple and funny.
If you haven't watched the film yet, I recommend it. It's an animated film, but it's really touching.


jueves, 7 de marzo de 2013

Tarjeta Amy Tangerine

Esta semana he comprado en Scrap i Pebre unos papeles de Amy Tangerine en formato pequeño y algunos sellos de la misma colección y al llegar a casa pensé en hacer una tarjeta utilizándolos.
Para hacerla me he inspirado en los trabajos que hace Judy, de Judyscrap.
No se como puede hacer todo lo que hace. Me costó horrores acabar con la estructura que veis en la tarjeta: probando, colocando, moviendo, reordenando...
También quería usar Glimmer Mist en mi tarjeta, pero como no me atrevía a destrozar la composición, al final opté por aplicarla en la cartulina de base para que se viera un poco por los bordes.
Quería darle dinamismo y movimiento a la tarjeta y creo que lo he conseguido. ¿Que os parece?


This week I bought some papers in Scrap i Pebre from Amy Tangerine's Collection in small format and some stamps from the same collection as well. And, when I got home, I thought of making a card with them.
To make it I was inspired by Judy's works, from Judyscrap.
I don't know how she can make the amount of things she does. I found it very hard to get the composition you can see in the card: trying, placing, moving, rearranging...
I also wanted to use Glimmer Mist on my card, but I didn't dare to ruin the composition, so I finally applied it on the base cardboard to show it just a little on the borders.
I wanted to give dynamism and movement to the card and I thing I got it. What do you think?


martes, 5 de marzo de 2013

Tarjeta de los Miércoles - Pareja de Pajaritos

Os presento otra tarjeta de mis inicios (aunque tampoco es que haya mejorado mucho...)
En esos momentos estaba haciendo experimentos con diferentes papeles sobre los que aplicar sellos.
La tira rosa es papel de seda sobre el que estampé el pajarito y le di la vuelta para hacer una imagen-espejo del original. Y al igual que en la tarjeta anterior, todos los sellos, menos el que está sobre el papel de seda, están embossados con polvo transparente.


Here you are another card of my beginnings (although I haven't improved a lot yet...)
At that moment I was trying out with different papers to stamp on.
The pink strip is tissue paper. I stamped the bird on it and turned it over to make a mirror image of the already stamped bird. As in last card, all the stamps, except the one on the tissue paper, are embossed with clear powder.